Helpful Guides on each Category
Knowing how to read Fish Finder might just be what you need to turn a boring fishing adventure into one full of fun experiences.
Fishing is not just a hobby; it’s an adventure that brings anglers closer to nature and offers the thrill of the catch.
To enhance your fishing experience, imagine having x-ray vision that allows you to see beneath the water’s surface and locate the perfect fishing spots. Well, with a fish finder and the ability to read it effectively, you can do just that.
In this article, we will explore the art of reading a fish finder and deciphering its valuable information to help you become a more successful angler. So, let’s dive in and unlock the secrets of your fish finder!
What is a Fish Finder?
A fish finder is a valuable tool used by anglers to locate fish underwater. It employs sonar technology, which emits sound waves into the water and detects their echoes to create a visual representation of what lies beneath.
How deep can a fish finder read? How far can a fish finder see?
The depth range that a fish finder can read depends on various factors such as the model, transducer type, and water conditions.
Fish finders read depths ranging from a few feet to several hundred feet. Some advanced models even can read depths of thousands of feet.
The distance a fish finder can read primarily depends on the sonar beam angle and power of the device.
Fish finders can typically provide information within a cone-shaped area directly below the transducer. The width of this cone increases with depth.
In shallower waters, the fish finder can provide a wider coverage area, allowing it to “see” more of the surrounding underwater environment. However, as the depth increases, the coverage area becomes narrower.
Generally;
- With every 100 watts of power at 50 kHz, your fish finder is capable of displaying depth readings of up to 400 feet.
- Similarly, with every 100 watts of power at 200 kHz, your fish finder can show depth readings of up to 100 feet.
Our Fish Finders’ recommendation
From our testing and the review of other users, we recommend these if you are going for quality in your specific needs.
Overall Best Fish Finder
Best Features
Best Portable
For Bigger Projects
Best Deal
Pick 1.

Garmin Striker Vivid 7sv
- Easy-to-use.
- 7″ colour fishfinder with new vivid scanning sonar colour palettes.
- supports Garmin chirp traditional sonar and other scanning sonars (requires compatible transducer)
- High-sensitivity GPS to mark waypoints, create routes and view your boat’s speed
- Has built-in quickdraw contours mapping
- wi-fi connectivity
Pick 2.

Lowrance Elite-7 Ti2
- Active Imaging 3-in-1 sonar
- CHIRP, SideScan and DownScan with FishReveal.
- high-resolution images
- FULL NETWORKING: Ethernet connectivity
- 7-INCH MULTI TOUCH screen, easy to use and install.
- C-MAP CONTOUR: find key fishing areas.
How accurate is a fish finder?
A fish finder is very effective in helping an angler turn in a large catch.
However, fish finders are not infallible and can occasionally encounter limitations or challenges.
Factors such as water turbidity, vegetation, interference, and the size or behavior of the fish can affect the accuracy of the readings.
What can you see with a fish finder?
With a fish finder, you can see various aspects of the underwater environment. Here are some of the things you can typically observe:
- Depth: Fish finders provide accurate depth measurements, allowing you to determine the water depth at a specific location.
- Bottom Structure: Fish finders can display the composition and contour of the bottom, including changes in depth, presence of rocks, vegetation, or other structures.
- Fish: One of the main purposes of a fish finder is to detect fish. It can show fish icons or arches on the screen, indicating the presence and location of fish in the water.
- Underwater Objects: Apart from fish, fish finders can help identify other submerged objects like logs, submerged trees, submerged debris, or underwater structures.
- Thermoclines: Fish finders can reveal thermoclines, which are distinct layers of water with different temperatures. These layers can impact fish behavior and their preferred habitat.
- Baitfish: In addition to larger fish, fish finders can sometimes detect schools of smaller baitfish. These baitfish are often pursued by predator fish and can provide valuable information for anglers.
Related: Ice fishing: An In-depth Beginners Guide.
Components of a Fish Finder
The main components of a typical fish finder include:
- Display: The display unit is where the information gathered by the fish finder is presented. It can be a screen that shows various data, such as depth, fish arches, and underwater structures.
- Transducer: The transducer is the key component that emits and receives sonar signals. It is usually mounted on the boat’s hull or transom and sends sound waves into the water. The transducer then detects the echoes from underwater objects, including fish, and sends the information to the display unit.
- Control Unit: The control unit allows the user to adjust settings and customize the fish finder’s operation. It typically includes buttons, knobs, and a user interface for menu navigation, adjusting sensitivity, changing display modes, and other functions.
- Power Source: Fish finders require a power source to operate.
- GPS (Global Positioning System): Many modern fish finders are equipped with built-in GPS functionality. This allows users to mark waypoints, track their position, and navigate accurately on the water.
- Chartplotter: Some fish finders include a chartplotter feature, which displays navigational charts and maps to users locate fishing spots, underwater structures, and contours.
- Networking Media: Advanced fish finders connect with other devices, such as radar, AIS (Automatic Identification System), or marine radios. This enables integration and sharing of data for enhanced situational awareness on the water.
- Mounting Hardware: Fish finders come with mounting hardware to secure the display unit and transducer to the boat.
Read Also: 5 Best portable Ice fishing Tent 2023. (Tested and approved)
Why is Learning to Read a Fish Finder Important
Learning to read a fish finder is essential for maximizing your fishing success.
By understanding the information it provides, you can identify fish, locate underwater structures, and determine the best fishing spots. It’s like having x-ray vision that reveals the hidden world beneath the water’s surface.
Quick Glance at how to Easily Read Your Fish Finder

Step 1. Set up your fish finder
- Ensure that your fish finder is properly installed on your boat or fishing kayak according to the manufacturer’s instructions.
- Power on the fish finder and adjust the settings as needed for the best performance in your fishing environment. This may include adjusting the depth range, sensitivity, and display settings.
Step 2. Understand the fish finder display
- Familiarize yourself with the different elements on the fish finder display. The display typically shows a graph or chart that represents the underwater terrain and the presence of fish.
- Learn to identify important features such as the depth scale, fish arches, structure, and vegetation indicators.
Step 3. Interpret the depth scale
- The depth scale shows the depth of the water column beneath your boat. It’s crucial to understand the depths where fish are likely to be found.
- Look for variations in the depth, such as drop-offs, underwater ledges, or humps, as these can be potential fish-holding spots.
Step 4. Identify fish arches
- Fish arches appear as curved lines on the fish finder display. They represent the movement of fish in the water.
- Larger fish typically show up as larger arches. Pay attention to the size and frequency of the arches to estimate the abundance and size of fish in the area.
Step 5. Recognize structure and cover
- Fish often seek shelter and food near underwater structures like rocks, submerged trees, or submerged vegetation.
- Look for irregularities on the fish finder display that indicate the presence of structures or cover. These areas can attract fish.
Step 6. Analyze the water temperature
- Some advanced fish finders can measure water temperature. Fish have preferred temperature ranges, so understanding the water temperature can help you locate the right areas to fish.
- Look for temperature changes or thermoclines, which are sudden shifts in water temperature, as these can concentrate fish.
Step 7. Experiment with sensitivity and range
- Adjust the sensitivity and range settings on your fish finder to optimize its performance.
- Higher sensitivity levels can help detect smaller fish or fish in deeper waters, but it may also pick up false signals. Experiment with different settings to find the optimal balance for your fishing conditions.
Step. Combine information for decision-making
- Take into account all the information provided by your fish finder, such as depth, fish arches, structure, and temperature, to make informed decisions about where to fish.
- Look for areas that have a combination of fish arches, structure, and changes in depth or temperature. These areas are more likely to hold fish.
Step. 9 Use your fishing techniques
- Once you’ve identified potential fishing spots using the fish finder, use appropriate fishing techniques for the species you’re targeting.
- Adjust your bait, lures, and fishing techniques based on the information provided by the fish finder and your knowledge of the fish species you’re pursuing.
Step 10. Adapt and learn
- Fishing is an ongoing learning process. Pay attention to patterns and refine your skills in interpreting the fish finder display over time.
- Keep track of successful fishing spots and techniques to develop your own knowledge base and improve your future fishing endeavours.
Read Also: Spearfishing: Working Techniques, Equipment and Safety Guides
How to Read and Interpret Fish Finder Sonar Readings
Sonar readings form the foundation of fish finder data interpretation. Sonar uses sound waves to create a detailed picture of the underwater environment.
Interpreting sonar readings on fish finders requires understanding the different elements and characteristics displayed on the screen.
Here are the key details to understand to enable you interpret sonar readings:
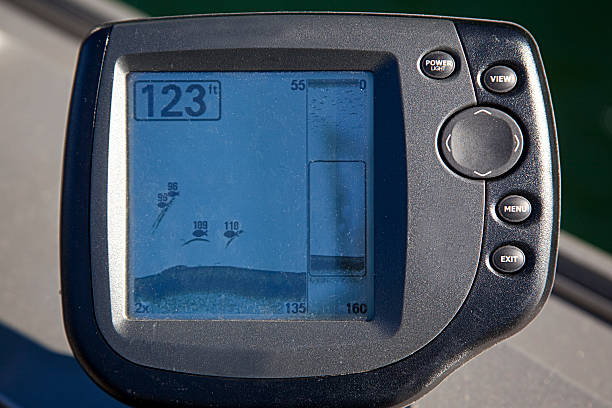
Depth
Sonar readings typically include depth information, which is crucial for understanding the water column.
The depth is usually displayed on the side or bottom of the screen and indicates the distance from the water’s surface to the bottom.
It helps you identify the vertical position of fish or structure in relation to the surface.
Arch/Line Patterns
When fish or other objects are detected by the sonar, they appear as arches or lines on the screen.
The shape and size of these arches can provide insights into the size and movement of the fish.
Larger arches often represent larger fish, while smaller arches or lines may indicate smaller fish or objects.
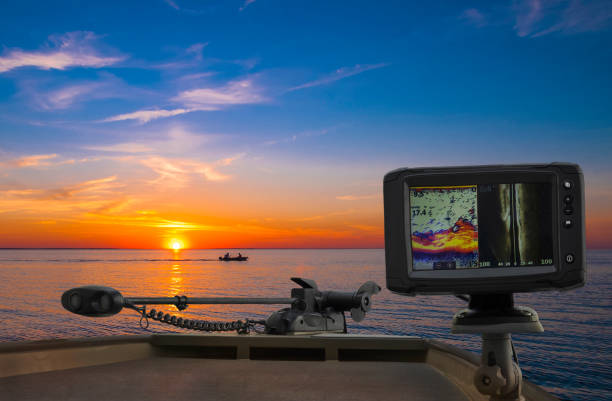
Color Differentiation
Some fish finders use color to differentiate between strong and weak sonar returns.
Typically, stronger returns are represented by brighter colors such as red, while weaker returns are displayed in darker colors like blue or green.
This color variation helps identify areas with higher fish density or more significant underwater structures.
Fish Symbols/Icons
Many fish finders offer the option to display fish symbols or icons on the screen to simplify fish identification. These symbols are often customizable, and you can assign different icons to different sizes or species of fish. Keep in mind that fish symbols are interpretations made by the fish finder and may not always be entirely accurate.
Bottom Composition
Sonar readings can provide information about the composition of the bottom, such as sand, rocks, or vegetation. A solid, flat line on the screen usually represents a hard bottom, while a jagged or irregular line indicates a softer or uneven bottom. Understanding the bottom composition can help locate areas where fish may be congregating.
Sonar History
Some fish finders display a historical view or scroll mode, which shows a trail of previously scanned sonar readings. This feature allows you to track the movement and behavior of fish and observe any patterns over time.
Sensitivity and Range
Adjusting the sensitivity and range settings on your fish finder can enhance the interpretation of sonar readings. Higher sensitivity settings can pick up more detailed information, but they may also display more noise or clutter.
Experiment with these settings to find the optimal balance for your fishing conditions.
Types of sonar readings
Sonar readings on fish finders can vary depending on the type of sonar used.
Here are some common types of sonar readings anglers can see on their fish finders:
Traditional Sonar
Also known as 2D sonar or depth finder, traditional sonar uses a single transducer to emit a sound wave in a cone-shaped beam. It measures the time it takes for the sound wave to bounce back after hitting an object, such as fish or the bottom of the water body.
Traditional sonar displays these echoes as arches or lines on the screen, representing the presence and depth of objects. The strength of the echoes can indicate the density or size of the objects.
Down Imaging
Down imaging sonar provides a more detailed view of the underwater structure directly beneath the boat. It uses high-frequency sound waves in a thin, fan-shaped beam to create a detailed image of the bottom and any fish or objects in that area.
Down imaging sonar displays a clearer picture with higher resolution, allowing anglers to identify fish-holding structures, submerged vegetation, and even individual fish.
Side Imaging
Side imaging sonar allows anglers to scan a wide area on both sides of the boat. It uses high-frequency sound waves in a wide, thin beam to create a detailed image of the underwater environment on either side.
Side imaging sonar provides a wider coverage area than down imaging and helps anglers locate fish, structure, and other features that may not be directly below the boat.
CHIRP Sonar
Compressed High-Intensity Radiated Pulse (CHIRP) sonar is a technology that uses a range of frequencies instead of a single frequency. It provides greater detail, improved target separation, and better clarity compared to traditional sonar.
CHIRP sonar emits continuous signals at varying frequencies, allowing it to differentiate between small objects and display them more clearly on the fish finder screen.
StructureScan
StructureScan is a type of sonar technology that combines down imaging and side imaging. It provides anglers with a comprehensive view of the underwater landscape in both directions, giving them a better understanding of the fish-holding structures, bottom contours, and other features.
These are just a few examples of the different types of sonar readings anglers can see on their fish finders. The choice of sonar depends on the specific fishing needs and preferences of the angler, as well as the fishing environment.
Identifying Fish Arches
Fish arches are distinct curved shapes that appear on the fish finder’s display.
These arches represent fish swimming within the sonar beam.
Typically, fish arches are displayed as curved lines or arcs. The size, shape, and intensity of the arches provide valuable information about the size, specie and density of the fish.
As you move through the water, observe the fishfinder’s display for arch-shaped echoes. Fish arches are often seen as continuous lines or arcs, sometimes with a tail. They may appear as individual arches or as groups, indicating a school of fish.
Reading Fish Icons
Many fish finders feature fish icons that represent different fish species. These icons simplify the identification process for anglers. Understanding the characteristics of these icons, such as size, shape, and color, helps you quickly determine the species you’re likely to encounter.
How to differentiate between different fish species based on the icons on the fish finder.
Differentiating between different fish species based solely on the icons on a fish finder can be challenging because fish finders typically use generic symbols or icons that represent fish in general rather than specific species.
However, here is a general approach you should follow to make better guesses about the fish species you might be meeting.
Familiarize yourself with common fish icons:
Start by familiarizing yourself with the typical fish icons used on your fish finder. These icons usually represent a generic fish shape or outline. They might vary in size, color, or additional markings, but they rarely represent specific species.
Consider size and depth
Pay attention to the size and depth of the fish icons displayed on the fish finder. Larger icons often indicate larger fish, while smaller icons suggest smaller fish. Additionally, if you notice certain icons consistently appearing at shallower depths, it might indicate a specific species that prefers those depths.
Use knowledge of local fish species
Depending on the region and body of water you’re fishing in, there might be certain fish species that are more common or likely to be encountered. Research the local fish species and their characteristics, such as size, shape, and typical depth preferences. This information help you make more accurate guesses about the fish species represented by the icons.
Cross-reference with other information
If you have access to other tools or sources of information, such as fish identification guides or smartphone apps, use them to cross-reference the fish icons on your fish finder. These resources often provide detailed images, descriptions, and specific characteristics of different fish species, helping you narrow down your identification.
How to Read Water Structure and Bottom Composition from the fish finder
Fish finders can reveal valuable information about underwater structures, vegetation, and bottom composition. You can identify submerged trees, rocks, or drop-offs where fish usually hide or cluster.
Follow these to identify underwater structures, vegetation, and bottom composition on a fish finder’s display;
Adjust the Fish Finder Settings
Begin by adjusting the settings of your fish finder to optimize the display for your specific fishing conditions. This may include adjusting the sensitivity, depth range, and frequency settings.
Understand Sonar Signal
Familiarize yourself with the different sonar signals and their representations on the fish finder’s display. Typically, solid structures such as rocks or man-made objects will appear as hard, defined returns, while vegetation or softer bottom compositions may display as less defined or irregular signals.
Identify Structural Features
Look for distinct features such as drop-offs, humps, ledges, or submerged trees. These indicate changes in the underwater terrain and potential fish-holding areas.
Interpret Vegetation
Vegetation often appears as dense, cluttered signals on the fish finder display. Look for areas with thick, consistent returns that could indicate submerged weeds or underwater plants.
Analyze Bottom Composition
The bottom composition can be read by examining the sonar returns. Hard bottoms, such as rock or gravel, typically produce strong, solid signals. Soft bottoms, like mud or silt, may display weaker, less defined signals.
Utilize Color and Depth Shading
Many fish finders offer colour-coded displays and depth shading features. These can provide additional visual cues to differentiate between different types of structures, vegetation, and bottom compositions.
As you explore different areas, compare the sonar returns on the fish finder display to develop a better understanding of the patterns associated with underwater structures, vegetation, and bottom composition. Over time, you will become more proficient at interpreting the display accurately.
Fish Finders’ GPS Integration
Fish finders with GPS integration offer the advantage of mapping and marking fishing locations. With GPS features, you can mark or save successful fishing spots and easily revisit them in the future. This integration streamlines your fishing strategy and ensures you never miss a productive spot.
If your fish finder has this, maximize the advantage.
Reading Water Temperature and Depth on a Fish Finder
Water temperature and depth are crucial factors that influence fish behaviour. Fish finders display real-time information about water temperature and depth, enabling you to identify temperature changes and depth transitions. You don’t need to do any calculations. The information displays on the fish finder.
How to interpret fish finder depth scale
Interpreting a fish finder’s depth scale is very straightforward.
- Understand the Units: Fish finders typically display depth measurements in either feet (ft) or meters (m). Make sure you know which unit your fish finder is using and adjust accordingly.
- Read the Numerical Values: Look for the numerical values along the depth scale. These values represent the depth measurements at different points on the scale. They are usually marked at regular intervals, such as every 1 ft or 1 m.
- Determine the Water Depth: To interpret the depth scale, observe the numerical value that aligns with a specific point on the scale. For example, if the numerical value aligned with a certain mark on the scale is 10 ft, it means that the water depth at that point is 10 feet.
- Observe Depth Changes: Pay attention to how the depth values change along the scale. If the marks on the scale are getting closer together, it indicates a steep drop-off or a sudden change in depth. Also, if the marks are further apart, it means a more gradual slope.
- Use the Scale as a Reference: The depth scale provides a visual representation of the underwater terrain. It allows you to gauge the depth of the water and locate potential fishing spots or underwater structures like drop-offs, ledges, or submerged objects.
Adjusting Sensitivity and Gain Settings for Effective Fish Finder Reading
To optimize your fish finder readings, it’s important to adjust the sensitivity and gain settings. Sensitivity determines the device’s ability to detect weak signals, while gain controls the amplification of the received signals.
Experiment with different settings to find the right balance that allows you to clearly distinguish fish from other underwater elements.
How to reduce interference and noise to improve the accuracy of fish finder data.
Interference and noise can hinder accurate fish finder readings.
To improve the accuracy of fish finder data and reduce interference and noise, here are some tips you can follow:
1. Positioning and Mounting:
- Ensure that the transducer is mounted correctly and securely on your boat or kayak. A stable mounting location helps reduce unnecessary vibrations.
- Install the transducer away from other equipment that may cause electromagnetic interference, such as radios, sonar systems, or motors.
2. Electrical Interference:
- Check for any loose or corroded electrical connections and repair them if necessary. Poor connections can introduce electrical noise.
- Use shielded cables for connecting the fish finder components. Shielded cables help prevent external electrical interference from affecting the signal.
- avoid running other electronic devices on your boat simultaneously, as they can introduce unwanted signals
3. Power Supply:
- Use a dedicated and clean power supply for your fish finder to minimize electrical noise. Avoid sharing power with other devices that may introduce interference.
4. Grounding:
- Properly ground your fish finder system. Grounding helps reduce electrical noise and interference.
- Connect the fish finder’s grounding wire to a clean and solid metal surface, ideally close to the battery or electrical ground.
5. Transducer Placement:
- Make sure the transducer is positioned correctly in the water. Ensure it is fully submerged and free from obstructions like weeds or air bubbles that could interfere with the signal.
6. Frequency Selection:
- Adjust the frequency settings on your fish finder to find the one that provides the best performance in your fishing environment. Experiment with different frequencies to reduce interference.
7. Gain and Sensitivity Settings:
- Optimize the gain and sensitivity settings on your fish finder. Adjust them to a level that eliminates unwanted noise while still detecting fish and underwater structures effectively.
8. Avoiding Air Bubbles:
- Minimize the presence of air bubbles around the transducer. Air bubbles can interfere with the sonar signal, leading to inaccurate readings. Trim your boat properly to reduce excessive turbulence.
9. Regular Maintenance:
- Clean the transducer regularly to remove any marine growth, debris, or dirt that can affect its performance.
- Inspect the cables, connectors, and transducer for any signs of damage or wear and replace them as needed.
Can I use my phone as a fish finder?
There are portable fish finders that can be connected to your smartphone making your smartphone act as the display for the fish finder. These are called mobile fish finders or smartphone fish finders.
They are small devices with lower power, yet they provide an incredible benefit by providing sonar without the need for a boat.
These fish finders are typically compact and light, easily fitting in the palm of your hand.
Using a smartphone fish finder is simple. Just connect it to your phone or tablet using Bluetooth or WiFi.
Your mobile device becomes the monitor by downloading the corresponding app for your fish finder. Most apps are compatible with both Apple iOS and Android devices, ensuring that everyone can join in the experience.
Can a fish finder be used in all types of fishing environments?
Fish finders are versatile tools that can be used in various fishing environments, including freshwater lakes, rivers, and even saltwater.
However, it’s important to choose a fish finder that is suitable for the specific fishing environment and conditions you’ll be encountering.
Conclusion
Your fish finder has the potential to transform your fishing outings into unforgettable adventures. By learning how to read and interpret the information it provides, you gain an invaluable advantage in locating fish and identifying productive fishing spots.
While your fish finder is a valuable tool, combining its insights with traditional fishing techniques is important. Pay attention to water currents, bird activity, and your own intuition to make informed decisions while on the water. Using both your fish finder and traditional angling methods will greatly enhance your chances of success.
So, as you head out on your next fishing expedition, equip yourself with the knowledge and confidence to read your fish finder effectively. See beyond the surface, uncover the hidden world beneath, and let your fish finder guide you to the perfect fishing spots. Embrace the excitement of the catch and the joy of connecting with nature. With your newfound X-ray vision, you’re ready to make every fishing trip a memorable one.
Frequently Asked Questions on Fish Finders
Can a fish finder guarantee that I’ll catch more fish?
While a fish finder provides valuable information, it doesn’t guarantee success.
It enhances your fishing experience by helping you locate fish and identify potential hotspots.
Is a fish finder difficult to use for beginners?
Fish finders may seem overwhelming at first, but with practice and familiarity, beginners can quickly learn how to read and interpret the information displayed.
Start with the basic functions and gradually explore advanced features as you become more comfortable with your fish finder.
Are fish finders only beneficial for boat fishing?
While fish finders are commonly used in boat fishing, they can also be utilized for shore fishing or kayak fishing.
Portable fish finders or castable sonar devices are available for anglers who fish from the shore or use kayaks.
How often should I update my fish finder’s software?
Periodically check for software updates from the manufacturer’s website and install them as needed.
What is the difference between a fish finder and a depth finder?
fish finders are packed with features made primarily to find fish, they can also show water temperature and have sonar. Depth finders only tell you the water’s depth, nothing more.
What colour is fish on a fish finder? What do fish look like on Finder?
On the display, the fish could show as either a blue or orange colour. But it largely depends on the manufacturer’s choice.
Like In the Garmin FishFinder 300c, the colour of fish icons that appear is determined by the beam width being used.
Do all fish finders show depth?
Every good fish finder manufacturer includes a depth gauge. Although most fish finders have depth detectors, we recommended you confirm that a fish finder has a depth detector before buying it.
Related Posts